Plugin Tutorial » History » Revision 32
« Previous |
Revision 32/119
(diff)
| Next »
Jiří Křivánek, 2010-01-21 20:16
I spent over 20 minutes when trying to figure out why the step-by-step guide did not work to me: Here is the workaround...
Plugin Tutorial
Note: To follow this tutorial, you need to run Redmine devel r1786 or higher.
- Table of contents
- Plugin Tutorial
Creating a new Plugin
May be you will need to setup the RAILS_ENV variable (in order to make the command below working:
$ export RAILS_ENV="production"
Creating a new plugin can be done using the Redmine plugin generator.
Syntax for this generator is:
ruby script/generate redmine_plugin <plugin_name>
So open up a command prompt and "cd" to your redmine directory, then execute the following command:
% ruby script/generate redmine_plugin PollsThe plugin structure is created in vendor/plugins/redmine_polls:
      create  vendor/plugins/redmine_polls/app/controllers
      create  vendor/plugins/redmine_polls/app/helpers
      create  vendor/plugins/redmine_polls/app/models
      create  vendor/plugins/redmine_polls/app/views
      create  vendor/plugins/redmine_polls/db/migrate
      create  vendor/plugins/redmine_polls/lib/tasks
      create  vendor/plugins/redmine_polls/assets/images
      create  vendor/plugins/redmine_polls/assets/javascripts
      create  vendor/plugins/redmine_polls/assets/stylesheets
      create  vendor/plugins/redmine_polls/lang
      create  vendor/plugins/redmine_polls/README
      create  vendor/plugins/redmine_polls/init.rb
      create  vendor/plugins/redmine_polls/lang/en.yml
Edit vendor/plugins/redmine_polls/init.rb to adjust plugin information (name, author, description and version):
require 'redmine'

Redmine::Plugin.register :redmine_polls do
  name 'Polls plugin'
  author 'John Smith'
  description 'A plugin for managing polls'
  version '0.0.1'
end
Then restart the application and point your browser to http://localhost:3000/admin/plugins.
After logging in, you should see your new plugin in the plugins list:

Generating a model
Let's create a simple Poll model for our plugin:
ruby script/generate redmine_plugin_model polls poll question:string yes:integer no:integerThis creates the Poll model and the corresponding migration file.
Please note you may have to rename your migration. Timestamped migrations are not supported by the actual Redmine plugin engine (Engines). If your migrations are named with a timestamp, rename it using "001", "002", etc. instead.
cd redmine/vendor/plugins/redmine_polls/db/migrate
mv  20091009211553_create_polls.rb 001_create_polls.rb
If you have already created a database table record in plugin_schema_info with the timestamp version number, you will have to change it to reflect your new version number, or the migration will hang.
Migrate the database using the following command:
rake db:migrate_pluginsNote that each plugin has its own set of migrations.
Lets add some Polls in the console so we have something to work with. The console is where you an interactively work and examine the Redmine environment and is very informative to play around in. But for now we just need create two Poll objects
script/console
>> Poll.create(:question => "Can you see this poll ?")
>> Poll.create(:question => "And can you see this other poll ?")
>> exit
Edit vendor/plugins/redmine_polls/app/models/poll.rb in your plugin directory to add a #vote method that will be invoked from our controller:
class Poll < ActiveRecord::Base
  def vote(answer)
    increment(answer == 'yes' ? :yes : :no)
  end
end
Generating a controller
For now, the plugin doesn't do anything. So let's create a controller for our plugin.
We can use the plugin controller generator for that. Syntax is:
ruby script/generate redmine_plugin_controller <plugin_name> <controller_name> [<actions>]
So go back to the command prompt and run:
% ruby script/generate redmine_plugin_controller Polls polls index vote
      exists  app/controllers/
      exists  app/helpers/
      create  app/views/polls
      create  test/functional/
      create  app/controllers/polls_controller.rb
      create  test/functional/polls_controller_test.rb
      create  app/helpers/polls_helper.rb
      create  app/views/polls/index.html.erb
      create  app/views/polls/vote.html.erb
A controller PollsController with 2 actions (#index and #vote) is created.
Edit vendor/plugins/redmine_polls/app/controllers/polls_controller.rb in redmine_polls directory to implement these 2 actions.
class PollsController < ApplicationController
  unloadable

  def index
    @polls = Poll.find(:all)
  end

  def vote
    poll = Poll.find(params[:id])
    poll.vote(params[:answer])
    if poll.save
      flash[:notice] = 'Vote saved.'
      redirect_to :action => 'index'
    end
  end
end
Then edit vendor/plugins/redmine_polls/app/views/polls/index.html.erb that will display existing polls:
<h2>Polls</h2>

<% @polls.each do |poll| %>
  <p>
  <%= poll[:question] %>?
  <%= link_to 'Yes', {:action => 'vote', :id => poll[:id], :answer => 'yes'}, :method => :post %> (<%= poll[:yes] %>) /
  <%= link_to 'No', {:action => 'vote', :id => poll[:id], :answer => 'no'}, :method => :post %> (<%= poll[:no] %>)
  </p>
<% end %>
You can remove vendor/plugins/redmine_polls/app/views/polls/vote.html.erb since no rendering is done by the corresponding action.
Now, restart the application and point your browser to http://localhost:3000/polls.
You should see the 2 polls and you should be able to vote for them:
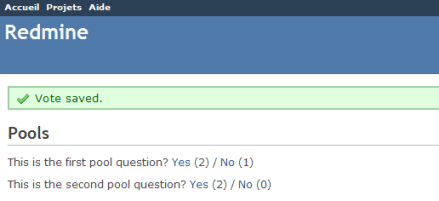
Note that poll results are reset on each request if you don't run the application in production mode, since our poll "model" is stored in a class variable in this example.
Extending menus
Our controller works fine but users have to know the url to see the polls. Using the Redmine plugin API, you can extend standard menus.
So let's add a new item to the application menu.
Extending the application menu
Edit vendor/plugins/redmine_polls/init.rb at the root of your plugin directory to add the following line at the end of the plugin registration block:
Redmine::Plugin.register :redmine_polls do
  [...]

  menu :application_menu, :polls, { :controller => 'polls', :action => 'index' }, :caption => 'Polls'
end
Syntax is:
menu(menu_name, item_name, url, options={})There are 4 menus that you can extend:
:top_menu- the top left menu:account_menu- the top right menu with sign in/sign out links:application_menu- the main menu displayed when the user is not inside a project:project_menu- the main menu displayed when the user is inside a project
Available options are:
:param- the parameter key that is used for the project id (default is:id):if- a Proc that is called before rendering the item, the item is displayed only if it returns true:caption- the menu caption that can be:- a localized string Symbol
- a String
- a Proc that can take the project as argument
:before,:after- specify where the menu item should be inserted (eg.:after => :activity):last- if set to true, the item will stay at the end of the menu (eg.:last => true):html_options- a hash of html options that are passed tolink_towhen rendering the menu item
In our example, we've added an item to the application menu which is emtpy by default.
Restart the application and go to http://localhost:3000:
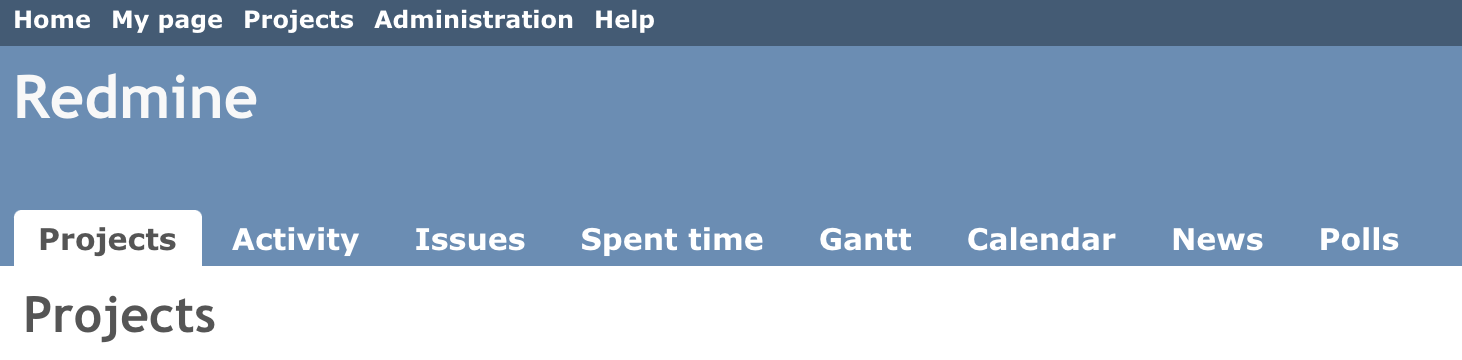
Now you can access the polls by clicking the Polls tab from the welcome screen.
Extending the project menu
Now, let's consider that the polls are defined at project level (even if it's not the case in our example poll model). So we would like to add the Polls tab to the project menu instead.
Open init.rb and replace the line that was added just before with these 2 lines:
Redmine::Plugin.register :redmine_polls do
  [...]

  permission :polls, {:polls => [:index, :vote]}, :public => true
  menu :project_menu, :polls, { :controller => 'polls', :action => 'index' }, :caption => 'Polls', :after => :activity, :param => :project_id
end
The second line adds our Polls tab to the project menu, just after the activity tab.
The first line is required and declares that our 2 actions from PollsController are public. We'll come back later to explain this with more details.
Restart the application again and go to one of your projects:
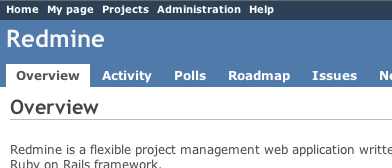
If you click the Polls tab, you should notice that the project menu is no longer displayed.
To make the project menu visible, you have to initialize the controller's instance variable @project.
Edit your PollsController to do so:
def index
  @project = Project.find(params[:project_id])
  @polls = Poll.find(:all) # @project.polls
end
The project id is available in the :project_id param because of the :param => :project_id option in the menu item declaration above.
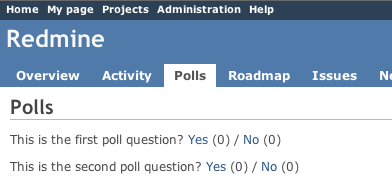
Now, you should see the project menu when viewing the polls:
Adding new permissions
For now, anyone can vote for polls. Let's make it more configurable by changing the permission declaration.
We're going to declare 2 project based permissions, one for viewing the polls and an other one for voting. These permissions are no longer public (:public => true option is removed).
Edit vendor/plugins/redmine_polls/init.rb to replace the previous permission declaration with these 2 lines:
  permission :view_polls, :polls => :index
  permission :vote_polls, :polls => :vote
Restart the application and go to http://localhost:3000/roles/report:
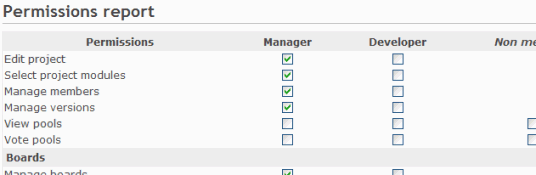
You're now able to give these permissions to your existing roles.
Of course, some code needs to be added to the PollsController so that actions are actually protected according to the permissions of the current user.
For this, we just need to append the :authorize filter and make sure that the Herve Harster instance variable is properly set before calling this filter.
Here is how it would look like for the #index action:
class PollsController < ApplicationController
  unloadable

  before_filter :find_project, :authorize, :only => :index

  [...]

  def index
    @polls = Poll.find(:all) # @project.polls
  end

  [...]

  private

  def find_project
    # @project variable must be set before calling the authorize filter
    @project = Project.find(params[:project_id])
  end
end
Retrieving the current project before the #vote action could be done using a similar way.
After this, viewing and voting polls will be only available to admin users or users that have the appropriate role on the project.
If you want to display the symbols of your permissions in a multilangual way, you need to add the necessary text labels in a language file.
Simply create an *.yml file in the vendor/plugins/redmine_polls/lang directory of your plugin and fill it with labels like this:
  permission_view_polls: View Polls
  permission_vote_polls: Vote Polls
In this example the created file is known as en.yml, but all other supported language files are also possible too.
As you can see on the example above, the labels consists of the permission symbols :view_polls and :vote_polls with an additional permission_ added at the front.
Restart your application and point the permission section.
Creating a project module
For now, the poll functionality is added to all your projects. But you way want to enable polls for some projects only.
So, let's create a 'Polls' project module. This is done by wrapping the permissions declaration inside a call to #project_module.
Edit init.rb and change the permissions declaration:
  project_module :polls do
    permission :view_polls, :polls => :index
    permission :vote_polls, :polls => :vote
  end
Restart the application and go to one of your project settings.
Click on the Modules tab. You should see the Polls module at the end of the modules list (disabled by default):

You can now enable/disable polls at project level.
Improving the plugin views
Adding stylesheets
Let's start by adding a stylesheet to our plugin views.
Create a file named voting.css in the vendor/plugins/redmine_polls/assets/stylesheets directory:
a.vote { font-size: 120%; }
a.vote.yes { color: green; }
a.vote.no  { color: red; }
When starting the application, plugin assets are automatically copied to public/plugin_assets/redmine_polls/ by Rails Engines to make them available through your web server. So any change to your plugin stylesheets or javascripts needs an application restart.
Then, append the following lines at the end of vendor/plugins/redmine_polls/app/views/polls/index.html.erb so that your stylesheet get included in the page header by Redmine:
<% content_for :header_tags do %>
    <%= stylesheet_link_tag 'voting', :plugin => 'redmine_polls' %>
<% end %>
Note that the :plugin => 'redmine_polls' option is required when calling the stylesheet_link_tag helper.
Javascripts can be included in plugin views using the javascript_include_tag helper in the same way.
Setting page title
You can set the HTML title from inside your views by using the html_title helper.
Example:
<% html_title "Polls" -%>Updated by Jiří Křivánek about 16 years ago · 32 revisions